Back

Vortex Studio 2017b Feature – Introducing a New Hardware Input Mapping System

One of many improvements in Vortex Studio 2017b is an entirely new system for managing hardware input mappings. In the past, configuring hardware input devices to interface with Vortex Mechanisms was time-consuming, as it frequently required writing custom control scripts. More importantly, making any changes to the button mappings required directly modifying the contents of the simulation scene. The new Control Interface streamlines the process. In this post, we’ll provide a general overview of the improved workflow for configuring and remapping a simulation’s control scheme, and introduce one of its most exciting aspects, which is the ability for you to add custom control presets.

This post is structured in three parts:

  • Defining and contextualizing hardware inputs
  • Logically linking the properties of the simulation content to the hardware inputs
  • Creating custom mappings in Vortex Studio Player

1. Defining and contextualizing hardware inputs

In order to expose the hardware inputs for use with the Vortex Studio simulation content, they must first be added to a Control Interface. A new Control Interface can be created via the new “Control” entry appearing in the Home page of Vortex Studio’s Editor application.

Mapping System Control - Presets
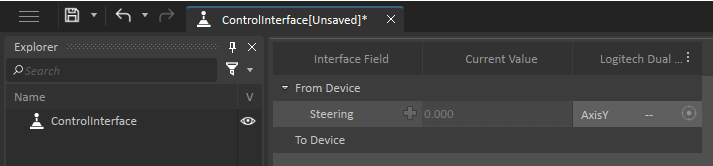
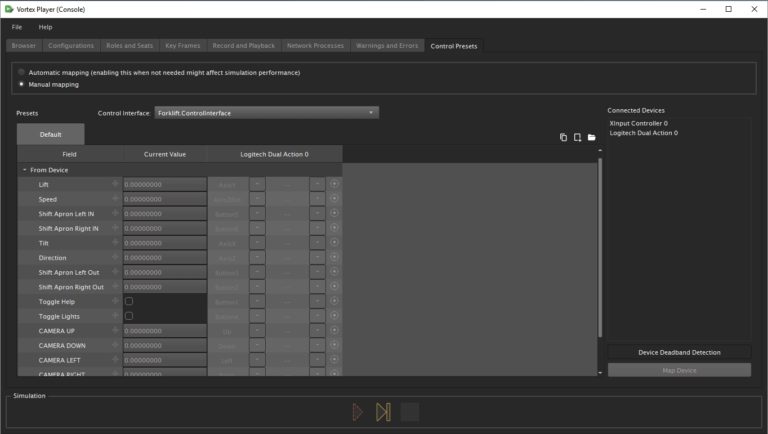
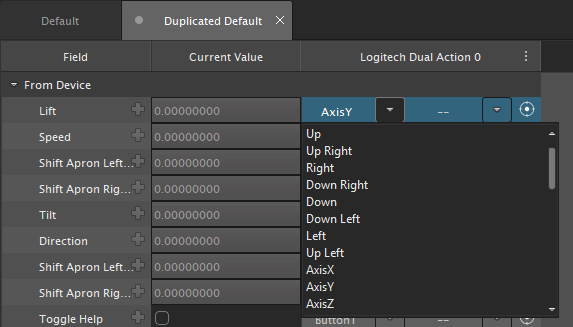
The process of exposing hardware inputs is fairly simple: Add a hardware input device, create a dedicated Control Interface input for each function destined for use in Vortex Studio, and finally map these inputs to actual hardware buttons or axes. The hardware’s LEDs or other visual indicators can also be mapped for use inside the simulation content as Control Interface outputs. In the example below, the Control Interface contains a standard USB game controller and an input called “Steering” mapped to the device’s Y Axis.
Mapping System Control -Interface

The data can be saved and exported as a .vxcontrol file, a new Vortex Studio file type introduced in our 2017b release for this very purpose. An existing Control Interface can also be imported into any Mechanism via the “Control Interface From File” toolbox entry.

Mapping System - Control Interface From

Note that a Control Interface must be instantiated in a Mechanism or Scene to enable the linking process.

2. Logically linking the properties of the simulation content to the hardware inputs

The next step is to logically link Control Interface inputs and outputs, which now correspond to hardware device inputs and outputs, to simulation content functionality. This operation is done via the Control Interface Linker rather than Connection Containers. The Control Interface Linker is accessible via the “Edit Links” context menu for the Control Interface instance in the Mechanism.

Mapping System - Edit Links

The Control Interface Linker, as the name implies, is used to establish a logical connection between the Control Interface inputs/outputs in the left column, and the Mechanism or Scene properties in the right column.

Mapping System -Forwarder Controls

As the left column will always be pre-populated with the inputs and outputs defined in the Control Interface itself, the only remaining step is to drag and drop items from the Editor’s Property Browser into the rightmost column. Note that the input type listed in the central column will impose restrictions on which properties can be associated with a given Control Interface Linker entry. To change the input type, modify the corresponding input/output in the Control Interface document itself. 

3. Creating custom mappings in Vortex Studio Player

In the final part of this blog post, we would like to present the Control Presets page in the Vortex Studio Player. Whenever any simulation content containing a valid Control Interface is loaded into the Player application, the “Control Presets” tab will appear in the “Vortex Player (Console)” window.

Mapping System - Vortex Player Console

This tab will list the full mapping information present in the simulation as well as a list of connected devices. This allows you to make custom Control Presets, offering an elegant solution for on-demand changes to the simulation’s control scheme. In order to make any changes in the Control Presets page, you must either create a brand new custom Control Preset or duplicate the Default Preset. The Default Preset displays the original configuration of the Control Interface .vxcontrol file and cannot be modified in Vortex Studio Player. This is done deliberately to prevent you from accidentally saving changes which would make the simulation unusable. The Control Presets page instead offers non-destructive editing in the form of custom Control Presets. This is best demonstrated by duplicating the Default Preset via the “Duplicate Current Preset” button (below). This creates a new Preset, which contains all the information from the Default Preset and is also fully editable: Each line of the table can be remapped, and even the original hardware device referenced in the mapping can be changed. By default, the Control Presets page is set to the manual mapping mode. This means that to modify a mapping, you must select the desired button or axis from a drop-down list.

Control Presets - Panel

However, in many cases the optimal workflow is to have the software automatically create the mapping link when a hardware button or axis is actuated. To do so, you can select “Automatic mapping” at the top of the Control Presets page. Once automatic mapping mode is enabled, you then select any of the cells under the hardware device column and interact with the hardware controller for a mapping to be automatically established in real time. After the custom Control Preset is remapped, it can be saved as a .vxpreset file via the “Save Current Preset” button. Please keep in mind that all Control Presets are tied to the unique identifiers of their respective Control Interfaces. In other words, a custom Control Preset will only be usable in the context of the exact simulation scenario it is created for. This concludes our overview of the Control Interface and Control Presets features. Advanced functionality related to these exciting new developments in Vortex Studio will be covered in greater detail in future blog posts. For more detailed information about the Control Interface and Control Presets page, please consult the product documentation.